Showing posts with label This Old House. Show all posts

Monday, December 26, 2016

Getting shed of the shed!

Many of you probably awoke to a white Dec 25th, if you got it hope you enjoyed it... I got up and opened the windows!  66 degrees.  I drove, with my son,  over the river, and through the woods up to my sisters house where Mom is until New Yrs, for the day and a meal prepared by my German BIL.  He did a great job! 


                                                                    SHORTS on Christmas

One year we had snow on the 26th...bummer.  So the Holiday is behind us whew...
I asked Santa for a new shed I drool over those catalogs that arrive in the mail with glistening new pole barns and sheds of every description size, and shape,,,,but then I check the price tag....the same ole' thing..."No Sondra, there is no Santa Claus".   Just like anything else in life if you want it bad enough you will make it happen with wit and sweat.  But first I have to destroy the old one!! 

It comes down in the reverse of how it went up..the siding,  then the roof, then the framing...
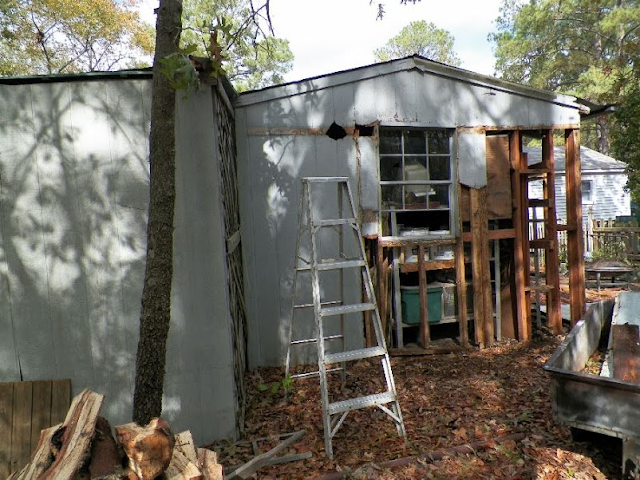


...then up on the ladder, it was the hardest part taking off the tin roofing...I didn't want to damage it too bad as I plan to re-use it!!  It has a nice patina don't you think? Or you might just call it rust...


...then I noticed in the bushy holly a tap tap tapping! A yellow bellied sapsucker busy making his own world a better place!


those little holes in the tree trunk is what he is busy doing, they drill a little hole, the sap seeps into the holes then bugs and such also get into the sap..so its like a juicy sappy bug snack. You can see he has a red throat patch and red forehead, the belly is a buffy yellow and the back is black with white/tan specks and white on his primaries! A very attractive bird!
So I had to get a few shots of him before continuing...soon all the tin was off.  
then I just tied a rope to the remaining frame,  gave 3 hard tugs and down it went!!


                                                  Now you can see the house!


It was easy to pull all this apart with it on the ground...and now Im salvaging what I can of the timbers, the tin is def usable, some of the rafters are good I pulled out the nails, and some of the 2 x 4 's have rot on the bottom end so I'll saw that end off I can make my walls 6 inches shorter.   This is not rocket science...

So Im using my circular saw and cutting the old siding into 12 inch wide pieces and trimming off the rotted parts and Ill use it like lap siding on the back and on the inside wall...nothing will go to waste. 

 one load of debris went to the dump...and Ill probably have one more small load to haul away,  SO a lot is being reused, recycled, and re-purposed!! 

I have removed one of the trees as planned and soon the other one will be on my firewood pile...its not a healthy tree so it will help to heat the house!
I do plan to plant more trees in the wood lot, some evergreens....since my woods never get the benefit of fire...the under-story has disappeared and all the trees are tall and not reseeding very well! Planting some evergreens  like Eastern Cedar and Holly will help give a green under story and replenish my wood lot. 

Next step is to start getting the foundation of the NEW shed in place!! Hope to start that as soon as I get all the 2 x 4's ready to reuse.   And I got a Lowe's Gift card for Christmas!! Yippie!  Later back inside,  I'm trying to perfect biscuit making what tips do you have for me? Don't forget I use only non animal products.   


these were good crispy outsides and soft inside.

PEACE
Eleanor Roosevelt: You must do the thing you think you can not.

Tuesday, December 13, 2016

Waiting on the World to Change

My World that is!!
...so most regular readers know I am trying to get my home and grounds back up to snuff after many years of neglect started in 2012 after the divorce decree!  So next on the list (altho it needs a new roof and a new HVAC unit), Im going ahead and doing some of the things I can do on my own or with minimal help and investment.

The shed is an eye sore! This shot shows how close it is to the house...its not normally THIS junky around  it I'm dragging stuff out in prep for the "TAKE DOWN" 


Its currently about 9 x 9...with a lean-to side of an additional 8 ft x 12 ft. an "L" shaped building I dn't need it to be that big. I used to have 2 riding mowers one died so its gone, I have 2 bicycles I only need one, so one is going soon...and there is more of my X's old cast off stuff that is going now that I am ready to tackle this job.  

As the house grew, with the porch addition, the shed got closer, and it blocks the view of the trees out back from the screen porch...so I've decided to make it smaller and move it. My new plan is for it to be 8 x 16 and rectangular in shape. One end is only a 3 sided affair as the mower and bicycles, wheel barrows etc go in there, I think a sliding barn style door will enclose that part of it and make it more weather tight.


 This is a big project.  I had hoped to actually rip it back to the studs and pick it up and move it over and turn the door so it is facing East. It currently faces the house! So I removed all the "stuff", the contents, and its now scattered all over the place and it looks like I'm having a huge rummage sale!! Tarps of every size and color are attempting to keep my gotta keep stuff under cover. It is a hideous mess. It may be too rotten to safely move so may have to completely dismantle it. I put most of the Stuff in storage containers to keep it dry. 


The new location is over to the right, and the gable/door end currently facing South will face East it will rotate 90 degrees. I want to keep it close to the house so when  doing yard maintenance or working on projects it's close enough that its not a deterrent from getting chores done.  In other words I don't want to walk a mile to get a screw driver!


when moved it will occupy this space (above).  I have to cut 2 trees, not a problem as one is bent at a funny angle and one is small--- will do that as soon as it quits raining!!  I have made  progress, now we have had several days of rain and drizzle, so Im stuck inside waiting on better weather to work in.


the end is all open now

the front is almost gone

these 2 large camellia trees, will stay although they are blocking some of the view maybe a trim back to shrub size is in order (?), it will be a change for me to get used to as the shed being where it is has also offered more privacy, but I'm ready to make that change and open UP the view around the back.

I can already see daylight!

PEACE
Eleanor Roosevelt: You must do the thing you think you can not.

Friday, January 30, 2015

Here's Mud in YOUR EYE...

And you hair, face, and all over your clothes!  The offending bucket of MUD! It was not too hard to get inside I did use the van's doggie ramp, rolled it down and let it land on the hand truck and rolled it inside! We women gotta use more brain since we have less muscle!! :o) Look how much I've already used!! I don't have a Hawk (one of those flat boards) so I just scoop out a good sized glob into a smaller bucket..


I watched a lot of you tubes the pros start off with a 4 inch knife or first layer it dries & you sand it, then a 6 inch knife, let it dry sand it, and then a 12" knife...I did none of that...
I realized if I put a glob of mud 4 inches wide in the center of the 8 inch knife it works best and on the second layer I put a 6 inch wide glob...and the last one,  my final coat will be 8 inches!  I was about ready to throw in the trowel after 4 days with no progress...but today I feel I can DO THIS! I've got one layer on each seam!! And I've got all the screw holes filled.  It will be many more days till its finished!! (lost all my in progress photos so some after shots)

                           My Sheetrocking of the ceiling done!


OH wanted to share this photo of the second French door in place..I finished that project up the week before the sheetrocking party....I ordered new hardware for it cause somewhere along the way this door lost its original lock set, this is called a Mortise lock set and I got the rubbed bronze finish it matches my others...


Here's how the 2 doors look in place you have to look beyond all the stuff in the way--the dishwasher and stove are still in the living room, and the fridge is on the porch ONE DAY tho...I think that white trim board to the left of the Fireplace is not straight I may have to remove it and straighten it up..hmmm.


SO that's the work I did this week...we put the dry wall up last Saturday and now its a week into the taping and I made progress!!  Check this out...I really was surprised to see this poking up through the brown leaves...SPRING is on the way!!


It was a lovely day here a bit windy and I'm sure I'll have a ton and a half of dead fall to pick up 


To all the football watchers hope you win!!

PEACE

Eleanor Roosevelt: You must do the thing you think you can not.

Saturday, January 24, 2015

Gracias!

Why is it so hard to get anything done these days??

Example:

Okay I've been trying to get someone to repair that section of roof on the project house where a leak was continuing around the chimney...for a year! 
the yukky leak mess
I even went up myself and gave it a try it actually worked for a while then drip drip drip it returned.. so last summer...
I called the fellow who built the room addition  I added when I moved back here from NYC, I figured he knew me, I knew him, paid him 15-$Grand for the work he did for me, he never even returned my call! (was I that hard to work for?) I saw him in Lowes not that long ago he smiled and asked how I was I wanted to say, "why didn't you return my call?"  Since I'm pretty socially inept I could have pulled it off but decided against it.
Several weeks later...
 I knew this guy I went to school with was a handy man/carpenter so I called him he came out gave me an estimate of $400 to redo the flashing around the chimney and replace the damaged shingles about a 3 foot section... he would come do it a week later,
never showed! 
several weeks after that....
I called a guy listed in the phone book he sounded asleep when he answered at 10 am--ALL I could hear was John Wayne in my head saying "daylights a burning,"   He promised to call me back and set up a time to come look, never did....crash n burn that one.
then a dry spell in the weather so it went on the back burner...

few weeks ago; I called this roofing company...they said they would call me next day-- they didn't --3 days later they called...they would send a guy at 6:30 am? Excuse me its dark at 6:30 am--okay he will come at 3:30 in the afternoon.  He showed up at 5:30 right before the sun set! He reeked of cigarette smoke, and my clothes had more paint and dirt on than his.... he had a clipboard and a tape measure with him. He measured, figured, and then came up with the price of 

$1470.00

This is a 10 x 10 foot section of the roof....They might get to it in a month and it will take an entire day with 3 guys working...he said: 2 squares of shingles would cost me $500.00??? Are they made out of Spun GOLD...I'm a regular in Lowes...I see all sorts of building supplies each week when I go to get the materials for my projects I have never in all my born days seen shingles that cost $250.00 a square!! (a square is 100 sq ft)...so where is this price coming from????
It's the "stick it to the unsuspecting lady price" uh huh....
He gave me the speech about being licensed bonded yada yada yada.. he wants half up front deposit!! I look THEM up on the web that night there was 4 complaints with the BBB (better business bureau) against them..okay not going in that direction!  START 0VER!

ONE DAY...
I saw a truck at a stop light, Vadal Roofing.  A Mexicanish looking young man ...hmmmm 
I jotted down the number, I called next day..a heavy Spanish accent legal/illegal?..I don't know! I set up an appointment for 10:30 am he shows on time he has no clipboard...he was wearing those mirror glasses---- I see me when I look at him..his Ingles' very broken...I explain I want that section about a 10 x 10 ft area completely re-roofed the chimney flashed all the way around and the neighboring section has to have some new shingles woven in where the chimney sits cause its leaking on all 4 sides!...

I have MY ladder in place its been there for months as I kept worrying about the condition of that area of the roof..he readjusts my ladder shows me how its in the wrong position to be safe...up he goes like a rabbit I swear he had his hands in his pockets, so nimble so quick I knew in a moment it must be St Nick? Up on the Roof there arose such a clatter....that is what came to my mind..lol---- 

He pulled out his phone and started to play with it...wth?  Climbs back down and says "I can do the flash, this section, 30 yr shingle, take me 6 hrs for $550." His phone is also a calculator, and camera he took photos of each thing he spoke about...and explained to me what he would do....oh now I see why he had  his phone out...high tech roofer!--

"When can you do it?"
 He says" FRIDAY" (this was on Monday)
I ask, "you want money up front?"
He says "NO" 
I say DO IT..he writes the estimate gives me a copy and his business card! On it is Vidal Roofing And General Contracting, Licensed and Bonded In this area 14 years

Friday 9:30 am he arrived, he has 2 helpers and a trailer full of materials, they get busy he speaks to his crew in Spanish, they are polite, quiet, they work steady non stop, they don't smoke, they clean up completely, in 5 hrs they are done he comes with his phone in hand shows me photos of each stage of the work they did...the job looks good he says I should have no more problems!
I pay the man!! They close and lock the gate on their way out!

Rained all day yesterday NO LEAKS!! :0)   Here is the new roof section----with the snazzy flashing! 


He told me I may get 2 more years out of the rest of the old roof but this section here is 30 yrs good to go!! I'll be 92 and it won't be my problem!  He said he would work with me and divide the roof into sections and I can do it section by section as I can afford it...just call him when I want to go with that.....now that's how I like to do business!


PEACE
Eleanor Roosevelt: You must do the thing you think you can not.

Wednesday, January 14, 2015

Open Concept kinda...

Im about ready to install that second french door in real time..but

Meanwhile...another project I've worked on and was on hold is now beginning to move again....it all started here in the before shot IT is this wall that separates the dining room from the kitchen! An awkward entrance from the back porch you turn immediately to your right and enter via this doorway (FAR left corner) ..the first french door I refinished used to be here in this doorway...as you see there was upper cabinets and the dishwasher and one base unit was under those and the little breakfast bar was angled in here.. the chandelier is in the dining room.
The purpose of this project is to give a more open concept and create  better traffic flow.


the french door, the bar, dishwasher and cabinets removed...that butterscotch door is the rear entry off the screen porch but in reality its the main entrance since the front of this house faces the property NOT the road..or parking area you drive up and enter the rear of the house longgg story.  I have made a lot of change to give better curb appeal to the rear entrance which is the front entrance..lol yes its backasswards. 


SO I wanted to change this up---with a more open concept and move the entrance  straight into the dining room.  Now the back door (butterscotch  with doggie door) used to open directly into the laundry room and I never liked that so the plan was this 
  1. remove the laundry machines---Done
  2. repair water damaged subfloor----Done
  3. remove the plumbing, pipes, etc --------Done
    (I watched a You Tube on how to "sweat copper" pipe and I cut the pipes and put caps on 'em!) everything I needed to do this job was in the old tool shed! Its a treasure trove of 38 yrs of collecting tools, gadgets, and the coffee cans of  "stuff" that every DIY'er accumulates over the years! I had the lead free solder, the flux, flux brush, the soldering torch, the sanding tool, all I had to buy was the brass caps got a pack of 5 for a couple $$ dollars. 
This is where the machines were...on this wall...Gone!! (still have not decided on where the laundry will now be :0/ BUT I'm sure it will come to me soon!  This foyer is about 5 x 10 ft.  


So now the entrance comes into a foyer/mud room and then into the dining room... This is a great spot for a coat rack a bench to sit down and put on shoes, and a place to stash keys and cell phones by the door! 

this will be painted when the room gets painted.The paneling will be painted... it kinda gives the appearance of bead board once its painted...this room will not get hardwood it will get Laminate floor...the door is too low to use the 1/2 thick plank and due to the doggie door being cut so low in the back door (my x did that) I cant trim any off the length....and  a new door  is NOT in the budget!! The thin laminate will have to do. AND the right turn doorway was closed up on both sides.


Next step to better traffic flow is to...

5.  Cut a new opening through the dining room wall!-----Done
you need a saws-all to do this! 
that shelf unit holds my tools and stuff so I can be somewhat organized on my job site! (its a complete mess right LOL) I see a ceiling fan on the top shelf so that's where that fan ended up if only I could find that pair of lost door hinges~


I used the trim that I took off the walk through.  Nothing is going to waste ...so the trim was reused around this new opening it matches what is in the rest of the house..the half way paneling is staying, it sort of ties the panel room to the dining.
Here is this opening from the other side the entrance/foyer side...I used some of the 1 x 4's taken off the ceiling to make trim for this door embellished it with some of those cute bulls eye wood discs on the upper corners.

To continue with open concept in that kitchen wall the old door entry was closed up..AND the wall where the overhead cabinets were was cut through to give more light and the header over the walk through to the dining room was removed up to the ceiling to give the room the appearance of more space and height...the old ceiling tiles have been removed and the kitchen and living room will get new sheetrock ceilings, the tile ceiling in the dining room may get sheet rocked too not sure yet depends on the budget IT did have a leak and some tiles were removed and I HOPE the roof will be repaired soon it has been very hard to get a roofer to do that job for me!! Ive had at least 4 promises and NONE have come to do the work!! Estimates have ranged form $1470.00 to $400...wth? The header is gone, the pass thru has been opened up...


from the other side standing in the new doorway.


the pass through was NOT what I wanted but this was a load bearing wall and I couldnt do a big heavy beam...so in the future if my son wants to go that route I've done half the work for him!


My sister and BIL are coming on Saturday and we plan to sheetrock the ceiling so another update is on the way!!  then I can finish trimming out this new  walk through, and start on the kitchen.....These changes are giving a more open floor plan and hopefully not taking away form the charm of the 1950's house...
It seems to be never ending---

OH there's lots more to come!!!


PEACE
Eleanor Roosevelt: You must do the thing you think you can not.

Sunday, June 15, 2014

All Before's no Afters

Some of you may be wondering what is going on at my project house...


its still a work in progress! Yeah the work came to an almost screeching halt with the injuries last yr, but I have not completely given up.  I do what I can for as long as I can and that will have to do for now!  I try to devote one hr per day to the projects and it varies as I jump from one thing to the next! 


I was back to stripping wall paper in this area that at one time was a hall way, it had 2 layers of paper covered with a layer of paint!! Time consuming but not to hard to get off I spray with water, and let it sit and then it slides right off...unfortunately I sometimes make a gouge mark in the sheetrock I'm trying to expose and that has to be spackled.  The attic step from whence I fell right there in this shot its closed of course and has to be replaced! 


There is paneling half way down that I'm leaving in place it will be painted...same color as the wall...the ceiling is ceiling tile.  I would like to remove these boards and replace this tile...we'll see-- that all depends on the budget and my recovery!  I got all the paper off in this area and began the spackling of the corners and bad specks...I took the bathroom door off the hinges, it has some problems Ill explain at another time...


This old hallway was a sunny yellow color! There was a wall right there where that corner is beyond the door to the right we took that down back in 1977 to give more room n the kitchen an old oil heater used to sit in that area, it was a dark creepy hallway... this house was built in the 40's or 50's and we moved it to this location in 1977 it traveled on wheels for 12 miles!  It used to sit right where there is a Wendy's restaurant now in town...it was a "town house" that came to the country!  ONE of these days Ill try to find the photos of the house being moved!


and the tear out of the bathroom has begun! 

sink, toilet, and wall board removed
old toilet in place
                    
old tile in place


old tile coming off

                                    There is old sheetrock under that old wall board! its in baaaaddd shape probably will have to come out...Where is the sledge hammer?

Next time you see this corner I hope it will be bare!! 
 ITS a long way from being anything like an After.... 

here is a tiny after....recall the ivy outside that was covering everything? I did get it under control...and I planted these 2 shrubs to fill in this empty spot. So far these shrubs are growing.


ivy out of control

.

There is plenty of other projects in the works...I don't have any AFTERS for now but one day...this place will be the envy of the neighborhood!


PEACE
Eleanor Roosevelt: You must do the thing you think you can not.

Sunday, September 15, 2013

The Day After Friday the 13th!!

Recall last week I was painting this bedroom..well now the painting is 99.9% done...because at the twilight minute I RAN OUTTA PAINT.........GRRRR..


This color doesn't photograph very well its not green, its more of a khaki....


 and as I said I wanted to replace the sliding closet doors with bi-fold ones because it gives better clearance to the closet, you can get STUFF in/out easier!! SO here are the directions....and the little plastic bag of PARTS holy cow.....ah-okay whats this?


In every language known to mankind...Notice on the box it says 3 easy steps?
Then there is the list of tools needed...here's my pile of tools..


The tool on the bottom of the pile is for PLAN B.... in case ALL ELSE FAILS
...no the real reason its there is IM ABOUT TO GO POSTAL....I mean go to the post office...because on that same morning the Post Office sent one of my ebay packages BACK TO ME..its in a flat rate envelope, it has flat rate shipping label attached, a postal note on it that reads---- (Return to Sender NOT FLAT RATE)?----- WTH? SAYS WHO? IF IT FITS IT SHIPS right??? Up to 70 lbs? This package weights 6 lbs. I'm trying to get over it, but UNTIL IM standing at that Post Office Window, and getting an explanation from the Postmaster... I can't calm down!! No this tool will NOT be in involved in that conversation...
____________________________________________________________________
A little dry fit and then I realized....


The bi-folds I got are 29 and 1/2 inches wide each, I got 2 sets, directions say keep at least 1/4 inch clearance on each side so it can clear the facing when its opening and closing....so I measured...MINE is gonna be "YIKES" 1/2 an inch too wide on both sides...
WHAT??? Now the tool on the bottom of the pile is starting to call my name...
"go ahead make my day" (a little worse if possible!!) 


SO the only thing to do was BLOW A HOLE IN THE (*&^% ) doors


or CUT 1/2 inch off each one! ( I know what you're thinking... did she cut it with the rifle?)  

NO I DIDN'T, I was feeling LUCKY so I used the circular saw....cut the side that fits next to the wall...does it look off? 


THE knobs that came with the doors are ridiculous, just a bare wood round knob, and there's no pre-drilled hole??What the??... so I've gotta drill a hole and put on knobs, I have some knobs that may work, but need longer screws to attach with ..Now I have to paint these and the room door you see up in the photo above, give the room a good cleaning....then its ready for the furniture to go back in...I just pushed it to the middle of the room while painting, and some of the furniture in here doesn't even belong in the bedroom...everything is a mess!  Its coming together tho, slowly but surely!! Im starting from the back and working my way to the front.... A bit dirty, and bit hairy, but I DID IT!!!


PEACE

Eleanor Roosevelt: You must do the thing you think you can not.